Introduction to LoRaWAN Asset Tracking Using the Helium Network
Adding the Browan Object Locator to your Helium Console account
The process to add the Browan Object Locator is the same as for the other LoRaWAN devices demonstrated in the prior modules. Before proceeding, please verify that you have completed module 2 and can access both your console.helium.com and tago.io accounts.
As described in detail earlier in this module, LoRaWAN devices are pre-programmed with the following unique EUIs and security credentials to support the OTAA on-boarding method:
- DevEUI (8-byte global end-device ID)
- AppEUI or JoinEUI (8-byte global application ID)
- AppKey (16-byte AES-128 root key, specific to the end-device)
Note
Currently deployed LoRaWAN networks, including Helium, support V1.0.x compatible sensors. The LoRa Alliance has defined a v1.1.x roadmap specification, and sensors and devices supporting the 1.1.x release will maintain backward compatibility with 1.0.x networks. However, 1.1.x devices support two security keys, the AppKey and NwkKey. A 1.1.x end-device will use its NwkKey (in lieu of its AppKey) to join a 1.0.x LoRaWAN network. Please refer to section 6.1.1.3 Device root keys (AppKey & NwkKey) of the LoRaWAN 1.1 Specification for full details.
LoRaWAN device EUIs may be printed on the label of the device, as shown below with the Browan Object Locator. The Browan sensors are LoRaWAN 1.1.x compatible and therefore provide both a AppKey and NwkKey. Since we are using these Browan sensors on a 1.0.x LoRaWAN compatible network, we will use each device’s NwkKey as the AppKey when onboarding it to the Helium network. The EUIs, AppKey, and NwkKey are provided via CSV files from either the manufacturer or the distributor where the device was purchased. If both an AppKey and a NwkKey are provided, use the NwkKey; if only an AppKey is provided, use the AppKey.

Example of Browan sensor with EUIs printed on label
The NwkKey (AppKey) for Browan devices is provided by the reseller or distributor where you purchased the device or by contacting Browan. The EUIs and AppKey (or NwkKey) for the Tektelic device are provided in a downloadable CSV file from either the manufacturer or distributor where the device was purchased. Important: The Browan Object Locator is a LoRaWAN v1.1.x device, and the device's NwkKey is used when deployed to the Helium network.

Example of Brown Object Locator EUIs and AppKey (NwkKey) provided from distributor
When onboarding large groups of sensors, you should create and import a CSV file with the required EUIs, AppKeys, device names, and labels. This step is optional but recommended. When adding a new device to the Helium Console, see instructions on how to format the CSV file, and then drag the appropriate file to upload devices.
The required CSV file field headers are DevEUI, AppEUI, AppKey, and Name. Optional fields include LabelID and LabelID2. Although technically these label fields are optional, when adding bulk devices via a CSV file, creating and using labels is necessary to prevent needing to go back and manually add data flows to each device.
Further device onboarding automation can be achieved via the Create Device API integration with console.helium.com. CSV file upload and API integration are alternative methods to bulk onboard devices; please refer to doc.helium.com for details on these methods.
Once you have located the EUIs and keys for your sensors, we can start adding them to your Helium Console account. Make sure you have logged into your Helium Console account using your email address.
Before adding the new tracking device, we will want to create a new profile that turns off ADR (Adaptive Data Rate). ADR allows devices to use an optimal data rate, which reduces power consumption and airtime on the network based on RF conditions. When ADR is disabled, the channel mask is still transmitted via ADR command, but power output and data rates are not impacted.
In general, use ADR for fixed or non-mobile devices to ensure reliable connectivity.
Select Profiles from the left side menu and then click the “+” symbol.

Click on “+”
Enter US 915 Mobile as the name for the profile, disable ADR, enable Join-Accept CF List (applicable to US915 devices only), and relax the Rx1 delay to 2 seconds. Then click Create Profile.

Recommended settings for mobile tracker profile
For more details on creating new profiles, please refer to module 2 of this series.
To add a new LoRaWAN device to Helium Console, click the “+” icon in the lower right corner of the screen and select Add Device.
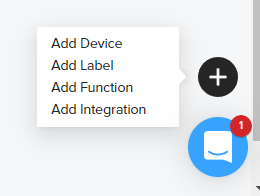
Add button menu options
Enter the required information for the device on the Add New Device window:
- Give your device a descriptive name (e.g. Leak Sensor).
- Enter the correct DevEUI, AppEUI (JoinEUI), and AppKey(NwkKey) for your device.
Remember, for this 1.1.x compatible Browan device, use the device's NwkKey value in the Helium Console App Key field. - Important: Add the Tago-Helium label created in module 2.
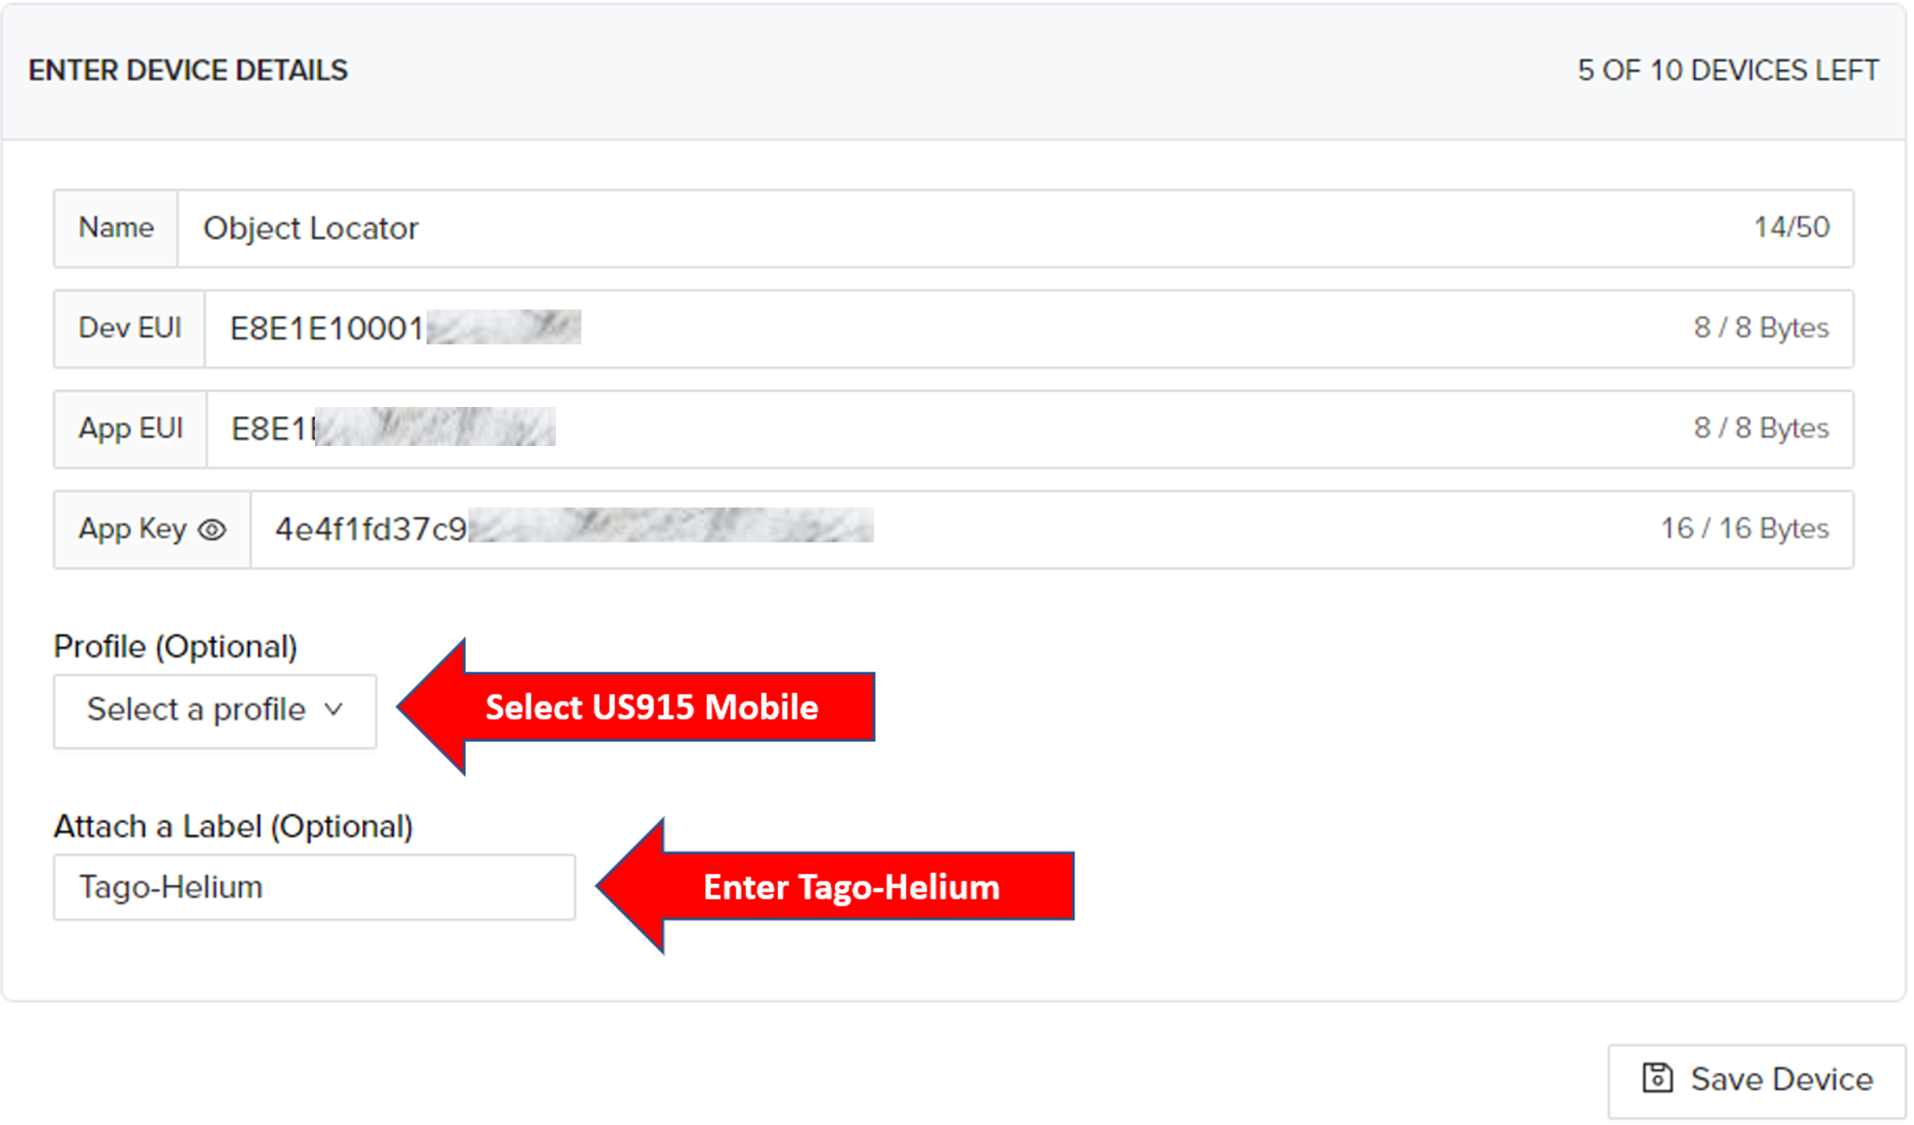
Browan Object Locator: Device name, device-specific EUIs and AppKey, and Tago-Helium label
When all information has been entered, click Save Device.
In order to save power, many new (never used) trackers use a slow network join cycle. This slow cycle ensures that the tracker will not exhaust its battery trying to join when it is in a transitory location without network coverage. In some cases, it may take up to 24 hours for a device to join a LoRaWAN network using this mode.
Most devices will enter an aggressive join cycle on initial power-up or reset. Please refer to each device's user manual for specifics.
Verify that the newly added tracker has successfully joined the network from the All Devices menu.

Monitor transmission activity to verify successful join
If the Browan Object Locator has not successfully joined after 10 minutes, it can be power-cycled by pressing and holding the side button for 10-15 seconds until the green LED flashes rapidly in a long sequence. After the LED stops the long rapid-flash sequence, press the button again to reactivate it. The device will attempt to rejoin the Helium network. Briefly pushing the button should result in a short flash from the LED and verify the device is active. If you do not see any LED activity when briefly pushing the button, then the device needs to be recharged OR reactivated by pressing and holding the side button for 10-15 seconds until the green LED flashes rapidly. Reminder: It is strongly recommended that the device is fully charged before onboarding.

Browan LED and button locations
Troubleshooting checklist:
- If you never see any message traffic for your device in the dashboard, then verify the following:
- Make sure that the device is in range of a Helium Hotspot and that the Hotspot is online.
- Check the real-time operational status of the Helium network.
- Double-check that the EUIs and keys are correct. Errors and typos when entering EUIs and keys are the most common reason devices fail to join.
- Verify that the device is powered and turned on.
- Verify that the device has not already been used on another LoRaWAN network. Refer to the device manufacturer’s manual on how to hard-reset a device so it can join a new LoRaWAN network.
- Wait up to 24 hours and check again. Most LoRaWAN devices join within a few minutes. However, in order to optimize battery life, some devices may take up to 24 hours to join a LoRaWAN network. Refer to your device’s manual for details on Join behavior and Join retry times.
- If you see the Join Request message but the Join Accept fails, or you never see uplink messages:
- Double-check that the JoinEUI (AppEUI) and AppKey are correct, and make sure that the device has not been used on another LoRaWAN network.
- For US915 devices, make sure that the profile has been set up with the ADR/CF-List options enabled and that this profile has been applied to the device in the Console.
- If you only see a low percentage of uplink messages from the device:
- If you are only seeing a random subset of uplink messages from your device, it may be at the fringe of Helium network coverage. If possible, move the device closer to a Helium Hotspot or near other Helium Hotspots. If you see an improvement in successful uplink transmissions, then poor RF coverage in the original deployment location is likely the root cause. Refer to Module 1 on options to deploy additional Helium Hotspots to enhance coverage in this area.
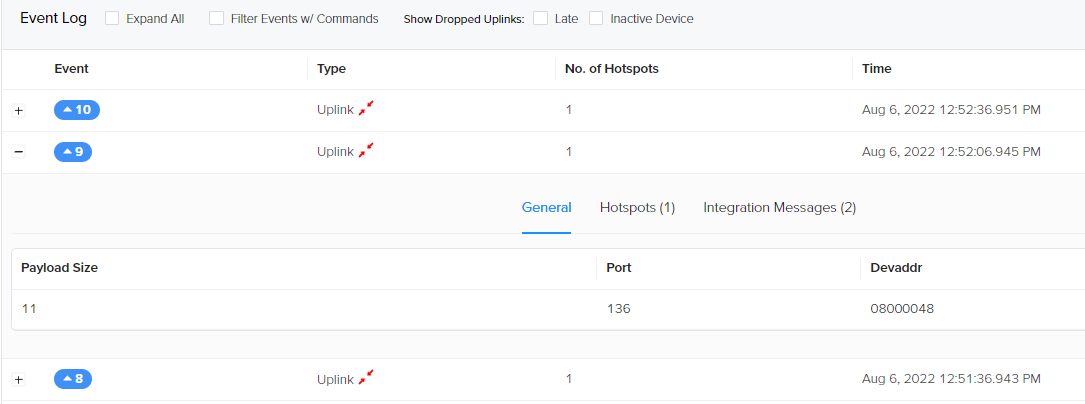
Details of the device’s Helium network activity
The Browan tracker also sends messages periodically based on device motion and health. For example, by default the Browan tracker sends a check-in message every 2 hours regardless of whether there is motion. In addition, the device will send health messages indicating low battery level when applicable. This information can be displayed in the application server dashboard.